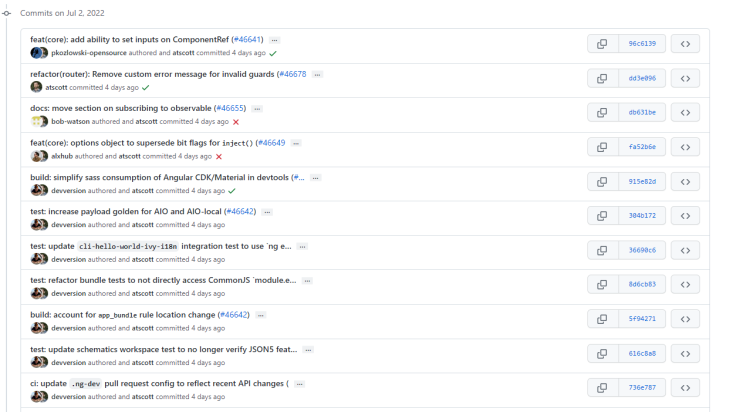
Git 每次提交代码,都要写 Commit message(提交说明),否则就不允许提交
1
| git commit -m "hello world
|
上面代码的-m参数,就是用来指定 commit mesage 的。基本上写什么都行,但是,一般来说,commit message 应该清晰明了,说明本次提交的目的。
本文介绍Angular 规范,这是目前使用最广的写法,比较合理和系统化,并且有配套的工具。如下

通过git commit的时候弹出一个vim编辑器来编辑模板类型的一份提交信息,主要格式如下:
1
2
3
4
5
| <type>(<scope>):<subject>
<BlLANK_LINE>
<?body>
<BLANK_LINE>
<?footer>
|
Comitizen
Commitizen是一个撰写合格 Commit message 的工具。
1
| npm install -g commitizen
|
然后,在项目目录里,运行下面的命令,使其支持 Angular 的 Commit message 格式。
1
| commitizen init cz-conventional-changelog --save --save-exact
|
以后,凡是用到git commit命令,一律改为使用git cz。这时,就会出现选项,用来生成符合格式的 Commit message。

进行了上面的操作,其实对于一个自觉地人来说,已经够了,但是没有约束就代表了自由,自由就有人越界,我如果不按约束提交,照样玩的嗨起,那么怎么给这些自由加一些约束呢?
commitlint校验
1
| npm i -D @commitlint/config-conventional @commitlint/cli
|
在项目更目录下建立配置文件 commitlint.config.js 或者 .commitlintrc.js
1
2
3
4
5
6
7
8
9
10
11
12
13
14
15
16
17
18
19
20
21
22
23
24
25
26
27
28
29
30
31
32
33
34
35
36
37
38
| module.exports = {
extents:[
"@commitlint/config-conventional"
],
rules:{
'body-leading-blank': [1, 'always'],
'footer-leading-blank': [1, 'always'],
'header-max-length': [2, 'always', 72],
'scope-case': [2, 'always', 'lower-case'],
'subject-case': [
2,
'never',
['sentence-case', 'start-case', 'pascal-case', 'upper-case']
],
'subject-empty': [2, 'never'],
'subject-full-stop': [2, 'never', '.'],
'type-case': [2, 'always', 'lower-case'],
'type-empty': [2, 'never'],
'type-enum': [
2,
'always',
[
'build',
'chore',
'ci',
'docs',
'feat',
'fix',
'improvement',
'perf',
'refactor',
'revert',
'style',
'test'
]
]
}
}
|
这样就可以对提交内容进行规范了
Husky限制
husky 负责提供更易用的 git hook。 结合 git hook 来检验 commit message,这样当你的提交不符合规范时就会阻止你提交
1
2
| npm set-script prepare "husky install"
npm run prepare
|
运行命令
每次运行npm install都会运行prepare命令,安装husky
husky6.0 版本不在配置package.json文件,改为使用命令生成.husky文件夹
会在当前项目根路径下生成.husky文件夹以及pre-commit文件,同时package.json会增加下代码
1
2
3
| "scripts": {
"prepare": "husky install"
}
|
启用git hook钩子
只有全局安装 husky 才能运行以下命令生成commit-msg文件
1
| husky add .husky/commit-msg "npx commitlint --edit --verbose"
|
否则在.husky下手动创建commit-msg文件
1
2
3
4
| #!/usr/bin/env sh
. "$(dirname -- "$0")/_/husky.sh"
npx commitlint --edit --verbose
|
当你有不符合规范的时候你将提交不了
安装其他 git 钩子只需要执行husky add .husky/钩子名字 "指令"就行了
比如可以添加pre-commit钩子在提交前对代码进行格式化
命令生成
1
| husky add .husky/pre-commit "npx lint-staged"
|
手动新建pre-commit文件
1
2
3
4
| #!/usr/bin/env sh
. "$(dirname -- "$0")/_/husky.sh"
npx lint-staged
|
然后安装lint-staged插件
1
| npm install -D lint-staged
|
在package.json里添加
1
2
3
4
5
6
| "lint-staged": {
"src/**/*.{js,vue}": [
"eslint --fix",
"git add"
]
},
|
最终在提交时都会进行commit-msg验证和代码格式化
自定义提交规范
如果我们想自定义提交规范也是可以的
1
| npm i -D commitlint-config-cz cz-customizable
|
并且在项目根目录创建.cz-config.js
commitlint.config.js,主要区别是extends,可以只用cz
1
2
3
4
5
6
7
8
9
10
11
12
13
14
15
16
17
18
19
20
21
22
23
24
25
26
27
28
29
30
31
32
33
34
35
36
37
38
39
40
41
| module.exports = {
extends: ['@commitlint/config-conventional', 'cz'],
rules: {
'type-enum': [
2,
'always',
[
'feature', // 新功能(feature)
'fix', // 修补bug
'ui', // 更新 ui
'docs', // 文档(documentation)
'style', // 格式(不影响代码运行的变动)
'perf', // 性能优化
'release', // 发布
'ci', // 集成流程修改(Travis,gitlab ci)
'refactor', // 代码重构
'chore', // 不属于以上类型的其他类型(日常事务)
'revert', // 回退
'merge', // 合并分支
'build' // 构建系统的修改
]
],
// <type> 格式 小写
'type-case': [2, 'always', 'lower-case'],
// <type> 不能为空
'type-empty': [2, 'never'],
// <scope> 范围不能为空
'scope-empty': [0],
// <scope> 范围格式
'scope-case': [0],
// <subject> 主要 message 不能为空
'subject-empty': [2, 'never'],
// <subject> 以什么为结束标志,禁用
'subject-full-stop': [0, 'never'],
// <subject> 格式,禁用
'subject-case': [0, 'never'],
// <body> 以空行开头
'body-leading-blank': [1, 'always'],
'header-max-length': [0, 'always', 72]
}
}
|
修改package.json
1
2
3
4
5
| "config": {
"commitizen": {
"path": "node_modules/cz-customizable"
}
},
|
.cz-config.js(这是目前已在项目中使用的配置)
1
2
3
4
5
6
7
8
9
10
11
12
13
14
15
16
17
18
19
20
21
22
23
24
25
26
27
28
29
| module.exports = {
types: [
{ value: 'feature', name: 'feature: 增加新功能' },
{ value: 'fix', name: 'fix: 修复bug' },
{ value: 'chore',name: 'chore: 日常提交' },
{ value: 'ui', name: 'ui: 更新UI' },
{ value: 'docs', name: 'docs: 文档变更' },
{ value: 'style', name: 'style: 代码格式' },
{ value: 'perf', name: 'perf: 性能优化' },
{ value: 'refactor',name: 'refactor: 代码重构' },
{ value: 'merge', name: 'merge: 合并分支' },
{ value: 'revert', name: 'revert: 回退' },
{ value: 'build', name: 'build: 构建文件变动' },
{ value: 'ci', name: 'ci: 集成流程变动' },
{ value: 'release', name: 'release: 发布' }
],
// override the messages, defaults are as follows
messages: {
type: '请选择提交类型:',
customScope: '请输入您修改的范围(可选):',
subject: '请简要描述提交 message (必填):',
body: '请输入详细描述(可选,待优化去除,跳过即可):',
footer: '请输入要关闭的issue(待优化去除,跳过即可):',
confirmCommit: '确认使用以上信息提交?(y/n/e/h)'
},
allowCustomScopes: true,
skipQuestions: ['body', 'footer'],
subjectLimit: 72
}
|
到此,一个完整规范的git commit就完成了
最后
如果不想自己手动配置也可以使用三方库,比如cz-git

